


We'll start with the frames. I used 5/16"x3/4" sized aluminum window frame to pinch a sheet of plastic between to frames I made to fit my 14"x18" wooden frame with binder clips. Simply make a miter-cut in the stock at the desired length and insert the frame corner brace (or "clip") to make a structural and rigid connection. Most average home builder stores will only carry the plastic clips.You need to find the metal ones online or from a local window/glass supply or tradesman.

Building the box is very simple, you just need to make sure of two things:
1. Your dimensions make sense with the pieces you have.
2. It's airtight.
To make the box airtight glue your connections liberally and the seal with a silicone adhesive. Use a PVC glue to adhere the piping and wrap connections in electrical tape for good measure.
I built the frame from 3" wide strips of 3/4" ply to be 14"x18". I added a crossbeam to create enough depth for the pipe elbow to fit into and it also adds some structural stability. When drilling the holes for the piping the pieces you're using will dictate the size and placement of the holes.
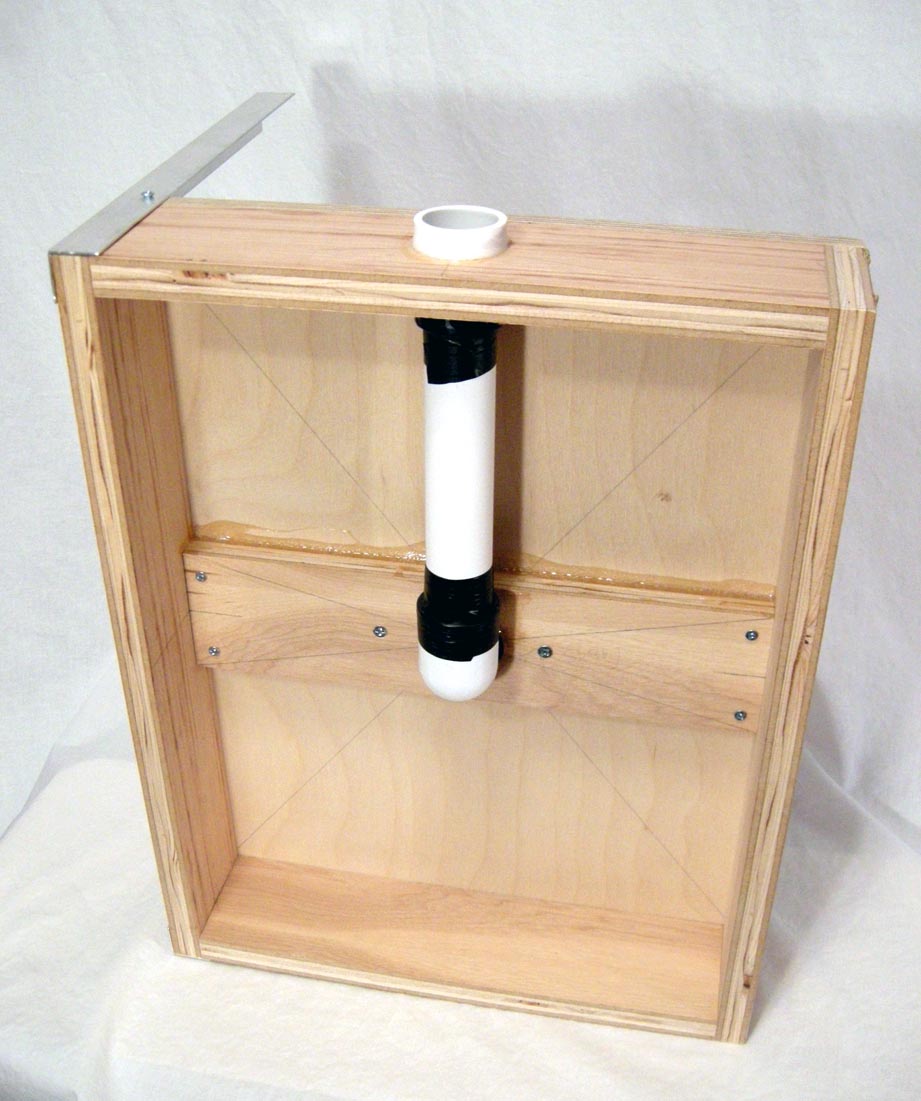
Once you have your frame you can create a gasket by cutting a rounded rectangle out of a 14x18" piece of 1/2" plywood preferably using a band or scroll saw but a jig saw will work too with an uglier cut. The gasket creates a void underneath the table plate where air can be channeled to a central point from all the small feeder holes in the platen. After drilling the hole where the pipe elbow will be inserted you'll make the table plate to be glued on top of it.
The table plate is made from a 12"x16" piece of 1/4" MDF. Use a router to round-over the top edge and corner edge of the platen so that they do not rupture the plastic. Draw out a grid and drill an array of 1/8" holes space around 1" apart which fall inside of the gasket. Once you've given it a sanding you can glue it to the center of the gasket - make sure this seal is airtight.

After the glue has dried and you've sealed the connection you can now connect the table plate and gasket to the frame. I used lots of glue and some finishing nails which were sunk below the surface. Once dried you can insert the piping and seal all the internal connections with silicone adhesive and electrical tape. Adding some aluminum "angle-iron" to act as guides is very helpful when bringing down your hot sheet of plastic.


Thats all there is too it. Operation is simple, you plug a shop vac hose into the spout and warm up the oven. (some commercial vacuums are strong enough to pull the air but check the ratings on what you can find in a thrift store) Place the mold (or "positive") on the center of the board and raise it slightly if necessary to the form. Pinch the plastic between the frames with a lot of connections and warm it in the oven. Depending on the plastic you use there will be different melting points. In generally they're between 250 and 300 degrees. I just use two mugs to hold up the frames in the oven. You then wait for the plastic to start sagging and then you're ready to go. Simply turn on the vacuum, and quickly remove the frames (with gloves of course) and lower it over your mold and down to the base where it will create a seal and suck the plastic over your positive.

Some tips: I have used PE, HDPE and HIPS and all worked relatively well. HDPE holds heat longer than PE which can be an advantage or a disadvantage. HIPS is great but the thinner sheets can become quite brittle - you'll need a strong vacuum to pull the thicker stuff. Most plastics I use with this setup are between .020" and .0625". Beware of undercuts - if you have any you will not be able to remove the positive easily or at all. Under the ball of the foot you can see an undercut and the undesirable effects it had on the cast not to mention its removal. Common sense would also suggest that you keep a tray beneath the level your heating the plastic on in the oven to avoid a mess if you happen to completely melt the sheet inadvertently. (Don't do that.)

There's lots of hobby sights that will tell you how to troubleshoot unwanted results.... like this one:
http://www.rcuniverse.com/forum/m_5086453/anchors_5086453/mpage_1/key_/anchor/tm.htm
To view the designs mentioned at the beginning of this post:
http://www.instructables.com/id/Make-a-good,-cheap,-upgradeable-sheet-plastic-vacu/
http://www.amazon.com/x18-Vacuum-Form-Machine-Prototype/dp/B001N0K43E/ref=sr_1_2?ie=UTF8&s=hi&qid=1308778860&sr=8-2
Thanks for this post !! Create products ranging in complexity from simple product packaging and vacuum forming plastic components to larger plastic components for the consumer electronics and automobile industries.
ReplyDeleteGreat article on thermoforming heating control systems thanks for sharing!
ReplyDeletePlasbox can supply you with most of your packaging needs because Plasbox can supply cardboard packaging, plastic packaging, Vacuum forming, shelf ready trays, slitting of rolls of plastic, sheeting of plastic, vacuum forming products manufacturer and thermo formed packaging for many different needs.
ReplyDeleteThis is a great inspiring article.I am pretty much pleased with your good work.You put really very helpful information. Keep it up. Keep blogging. Looking to reading your next post. best vacuum for carpet
ReplyDeleteI'm here to share my testimony of what a good trusted loan company did for me. My name is Nikita Tanya, from Russian and I’m a lovely mother of 3 kids I lost my funds on trying to get a loan it was so hard for me and my children, I went online to seek for a loan assistance all hope was lost until one faithful day when I met this friend of mine who recently secured a loan from Le_Meridian Funding Service She introduced me to this honest loan company who helped me get a loan in within 5 working days, I will forever be grateful to Mr Benjamin, for helping me get back on feet again. You can contact Mr Benjamin via email: lfdsloans@outlook.com lfdsloans@lemeridianfds.com, they do not know I’m doing this for them, but i just have to do it because a lot of people are out there who are in need of a loan assistance please come to this company and be saved.WhatsApp:(+1 989-394-3740)
ReplyDeleteThat is the excellent mindset, nonetheless is just not help to make every sence whatsoever preaching about that mather. Virtually any method many thanks in addition to i had endeavor to promote your own article in to delicius nevertheless it is apparently a dilemma using your information sites can you please recheck the idea. thanks once more. PalandSmith
ReplyDeleteBest quality machine supplier:
ReplyDeletePlastic food container |
Plastic thermoformer |
Box making machine |
Wpc |
Twin screw extruder |
Really inspiring DIY build—turning simple materials like a toaster oven and shop vac into a functional vacuum former shows how accessible this process can be.
ReplyDeleteProjects like this highlight the potential of vacuum thermoforming machines, proving you don’t always need expensive equipment to achieve great results.